Event planners share a lot of image files. Whether it’s in your portfolio, sharing inspiration, or for marketing purposes, here is the info you need to understand image files.
Understanding image files as an event planner will confer some advantages. Whether it’s making sure your images pop on The Knot, or emailing inspiration to clients, working with images can get a bit technical. And those aren’t the only reasons.
Why Understand Images Files Matters
Okay, let’s run through some common scenarios where you’re working with files. And what might go wrong. Later, we’ll discuss the solutions.
Your Online Portfolio
I’m going to assume you have a website with a portfolio section. Most event planners have something like this – even if it’s merely a page with pictures of recent events. Naturally, you want to upload your best images at the highest resolution. And sure, that’s going to ensure the photos look gorgeous.
But if your images are a few megabytes each, consider this. The web page might take ages to load. It’s entirely feasible your potential client gets bored waiting and meaders elsewhere.
Or perhaps you uploaded an image file with a reasonable size, but it’s all blurry when you click to zoom in.
Related: A Practical Guide To An Effective Website For Your Event Business
Mobile Loading Speeds
The large image file size and the slow loading speed is an even greater issue on mobile. Many mobile networks are slower than your home or office wi-fi, which means an even longer wait to view the portfolio.
Search Engine Optimization
Search Engine Optimization, or SEO, refers to how likely you are to rank for a keyword search on Google. For example, if someone googles “event planner in Boise,” you want to show up as a result (assuming you live and work in Boise).
But image files can either boost your ranking or have a negative impact. If your page takes too long to load because your image files are massive, then Google will promote others in front of you.
Testing Your Client’s Patience
So your client asked for some example images, so you decide to email them over. But because you took the raw image files that the photographer gave you, each picture is like 10MBs. So you need to send them over in different emails – that’s pretty lame.
Additionally, in event planning software like ThymeBase, you can add images to the event timeline and add reference photographs in the event planning task list. Smaller file sizes will both upload fast and load fast when you need to see the images.
Wasting Your Time
And just like above, working with large files wastes your own time. They take too long to upload, they’re clunky to share, and the entire process can ramp up your frustration.
Event Planner Crash Course On Image Files
Okay, so that’s a lot of problems. But what can you actually do about it? I’ll answer that, I promise, but first, let’s demystify image files. It will help you feel confident when making changes to your files.
Note: You must make copies of your image files before making changes to them. We’re going to discuss making changes to your files, and most of the actions are irrevocable. Safety first!
The Common File Types
As an event professional, you’ll often work with the same image file types as professional photographers – because that’s the file types they work with. So let’s explore the common file types you’ll see. But if you just want to move on to the problems and solutions are, let’s TLDR this:
Use PNGs and JPGs in most cases.
RAW File Type
Hopefully, you won’t need to deal with this file type very often. Still, if you’re taking your own photographs at a styled shoot or at your events, you’ll probably encounter it.
The RAW file is the image that your digital camera captures. It will be enormous in file size because it is uncompressed, containing the rawest image data with lossless quality. RAW has the fullest amount of detail for the photographer to work from. You might need professional photo editing software to work with RAW images.
But what on earth does lossless mean? Simple, it means that when you compress the image file, you won’t lose image quality. Compression only removes non-essential metadata (like what camera type took the picture). The downside is that compressing a RAW file won’t reduce the file size much, and the file will remain quite big.
TIFF File Type
The TIFF file is pretty much the same as RAW for all practical purposes except one key difference. The RAW file needs to be processed first (kinda like an old school negative of a photograph), but a TIFF is already processed.
So, like RAW, the TIFF file type is for professionals because it’s well suited for editing, like color-correction, without losing quality.
According to Wikipedia, “The ability to store image data in a lossless format makes a TIFF file a useful image archive, because, unlike standard JPEG files, a TIFF file using lossless compression (or none) may be edited and re-saved without losing image quality.
JPG File Type
The JPG (or JPEG) file is probably the most common image file you’ll come across. The file size is likely to be reasonable, so in general, they’re totally fine for most of your use-cases. But…
JPG files are lossy. That means that when you compress the file, the quality can decrease with each additional save through repeated editing. However, don’t let this scare you. They’re perfect for online use and sharing. If you’re careful about resizing the image, you likely won’t notice any decreases in quality.
When you save a JPG, most photo editing software allows you to choose the level of compression. The default often sits around 75 (out of 100), so just be wary of this. I prefer to stick at 100 until I actually need a smaller file size. Then I save a copy at 75, and it usually works out just fine.
Remember my note at the start? I’ll repeat that here. JPG files are lossy, so if you’re repeatedly compressing the file, and then working with the new file and compressing it, you’re losing quality. You’ll begin to see less clarity, the picture will look dull.
PNG File Type
If it’s possible to have a favorite file type, mine would be PNG. Apparently, it’s pronounced “ping,” but I’ve never heard anyone say that. PNGs tend to have smaller file sizes, much like JPGs, but they also have some cool advantages.
PNGs are lossless, so you won’t lose quality when you compress them. Also, if you use PNGs for images like your logo, they can have a transparent background.
I ought to add a caveat. PNG files can often have a web-friendly file size, but not always. And once you’ve stripped the file of the metadata (more on that later), you won’t be able to get the file size much smaller. So sometimes, you will need to use JPGs.
WebP Files
WebP, developed by Google, is a relative newcomer to the image file type scene. This format was designed to retain image quality while loading faster. According to Google, “WebP is a modern image format that provides superior lossless and lossy compression for images on the web. Using WebP, webmasters, and web developers can create smaller, richer images that make the web faster.”
“WebP lossless images are 26% smaller in size compared to PNGs. WebP lossy images are 25-34% smaller than comparable JPEG images at equivalent SSIM quality index.”
Google
Sounds great, right? Well, not quite. The WebP file type is ideal for your website, but not really usable when sharing files with a client. You can only open WebP files with web browsers or professional image editing software. Try explaining that to a client!
Forget The Other File Types
You’ve probably heard of Gifs, but there are some other image file types to avoid. These file types only bring various problems, and apart from Gifs and PDFs, they are unlikely to come up.
- GIF – great for banner ads and reaction gifs on Twitter. Lousy when it comes to quality.
- BMP – Just ignore.
- EPS – A graphics format for vector images, usually seen in Adobe Illustrator.
- PDF – Awesome file type for sharing presentations and documents. Kinda clunky when it comes to sharing lovely images. Let’s ignore this for now.
Now you’ve had a whirlwind tour through the basics of image file types, let’s dive into what goes wrong.
Why Are My Images Blurry
If you were to ask this of a photographer, you’d likely get a detailed response beginning with the words “it depends.” And yes, it does depend, but over a decade of seeing people upload blurry images online, here are the likeliest reasons.
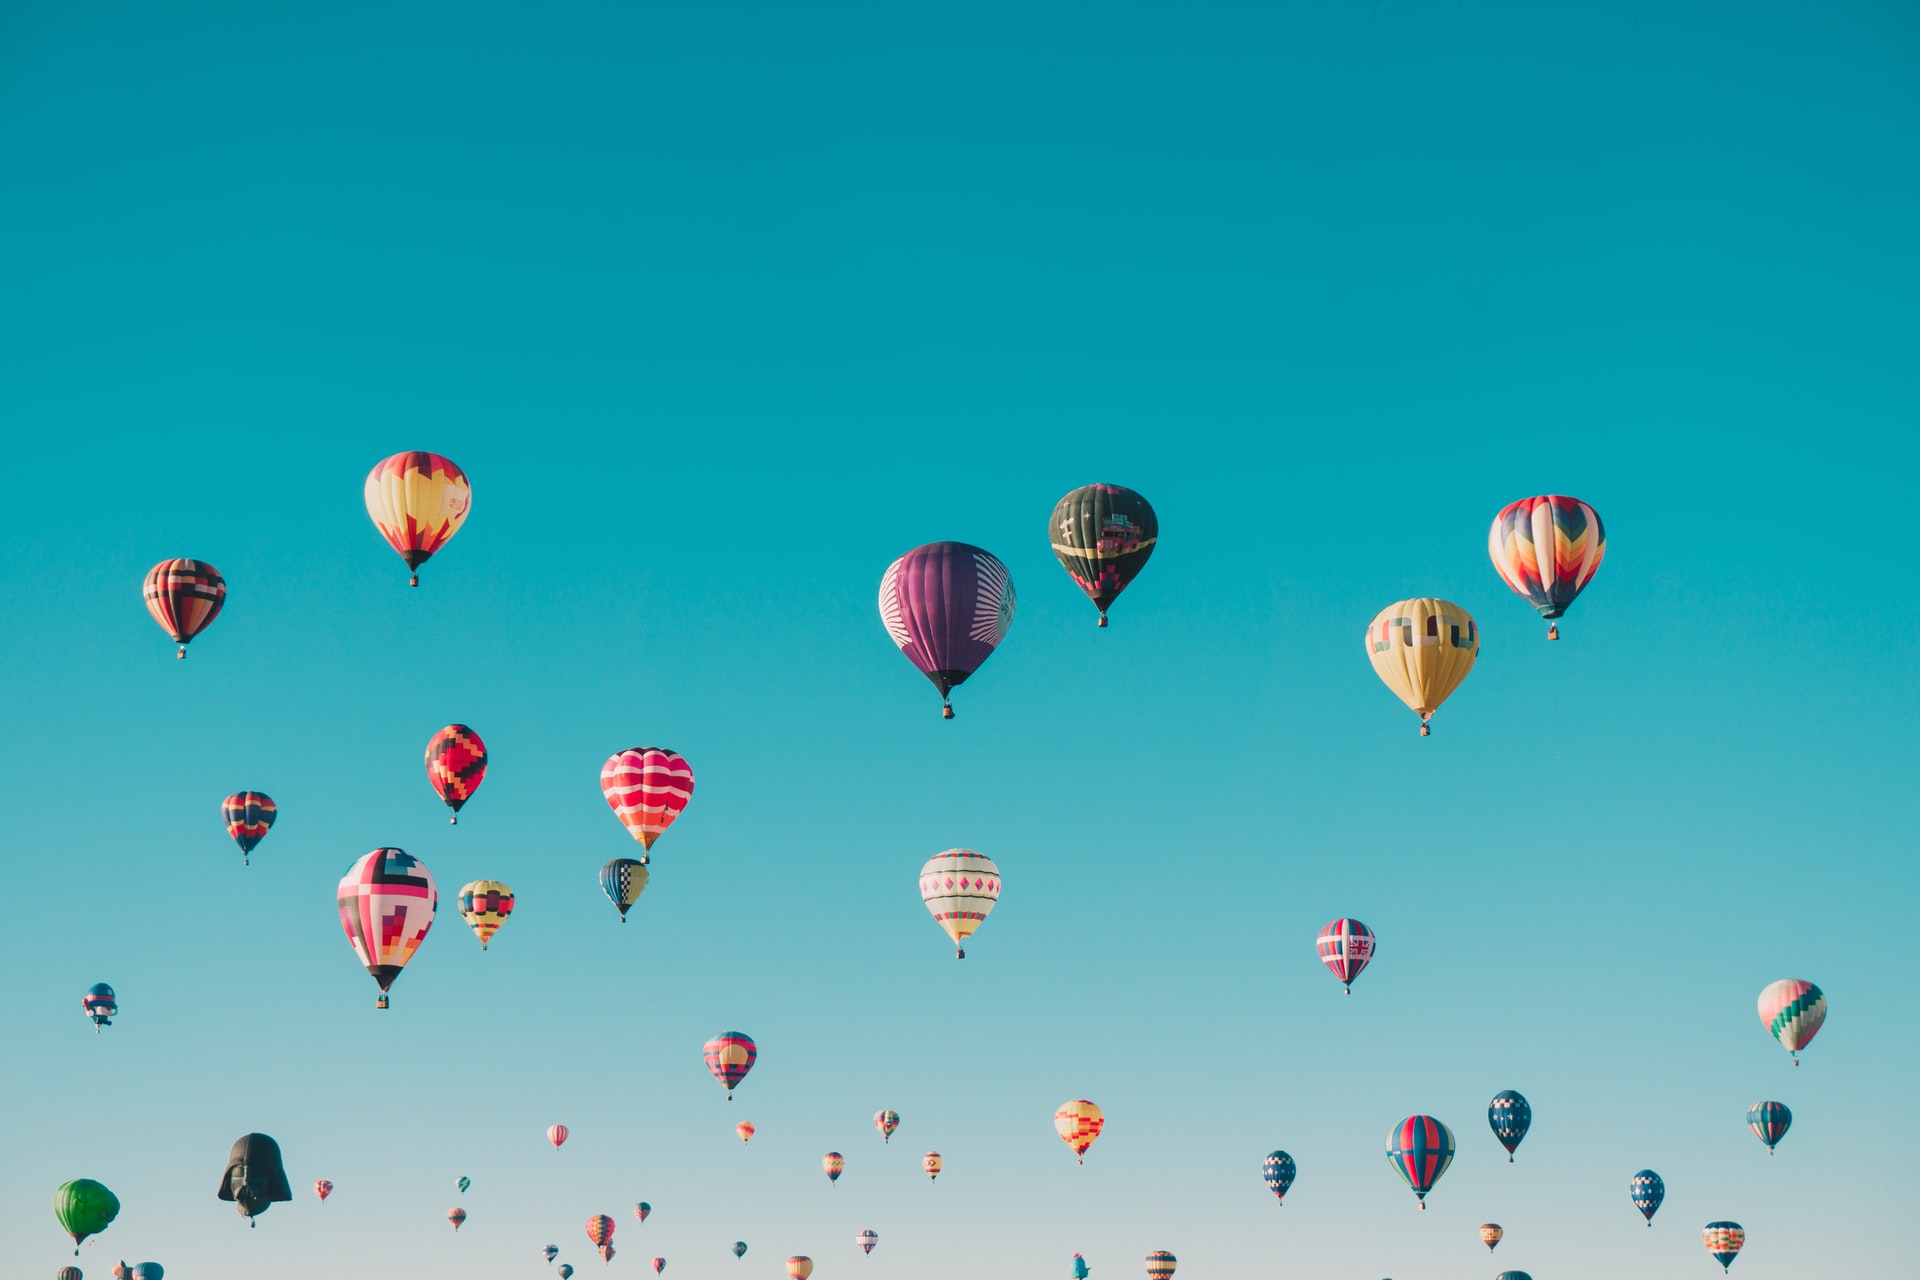
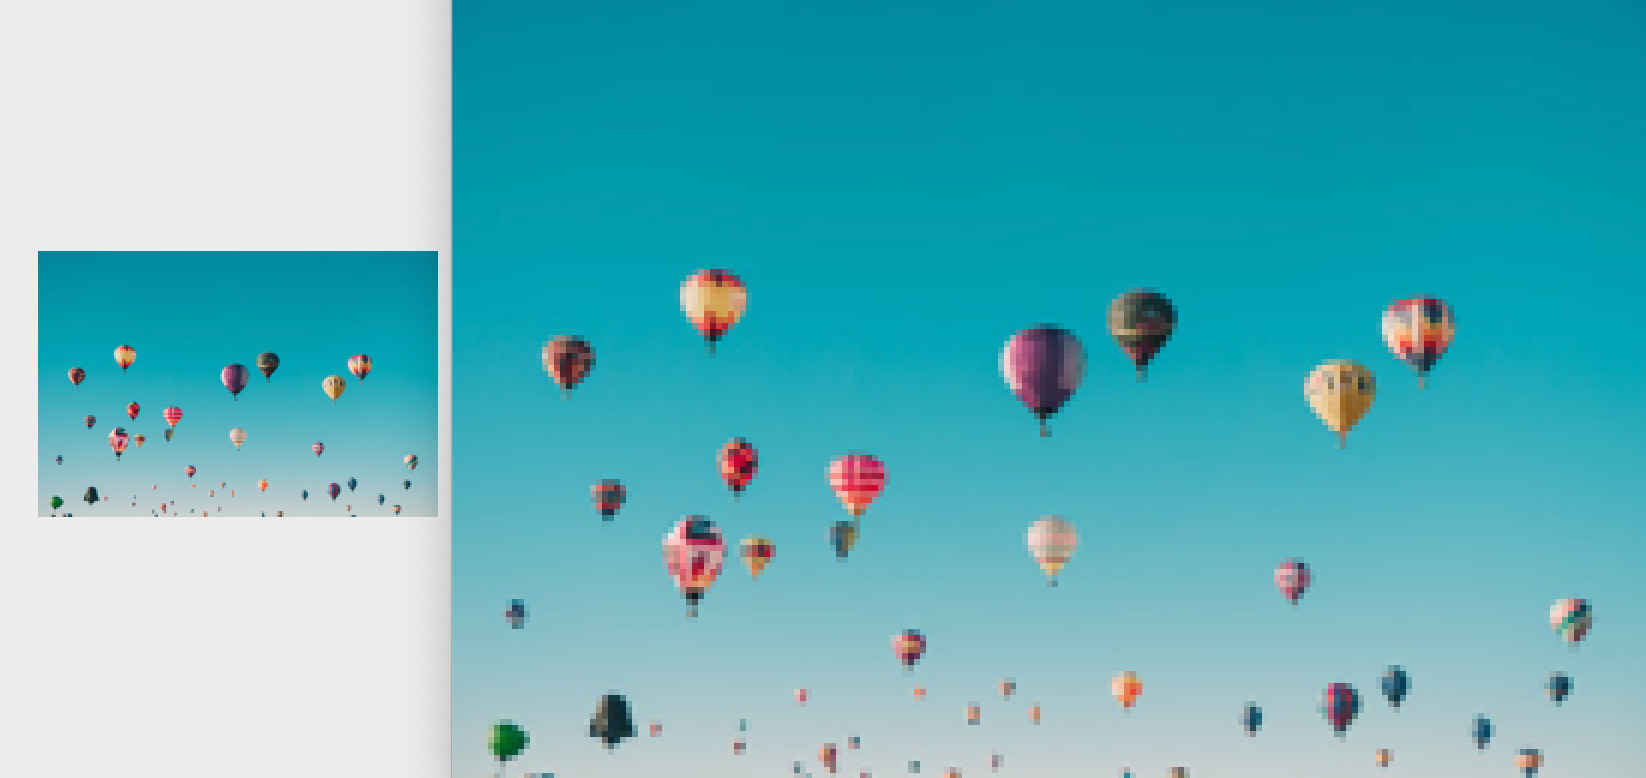
I’ll use this lovely by photo by Ian Dooley that I found on Unsplash to illustrate.
Small Picture, Big Space
Let’s say your image’s width is 500 pixels wide, and you’ve uploaded the picture into a frame that is 1000 pixels wide. The result is that the image will need to be stretched to fit, resulting in a blurry image. The technical reasons are pretty simple but tedious. Think about it like if you’d printed a picture on putty. Then when you stretched out the putty, things would get weird. Same thing happens here.
The Aspect Ratio Is Wrong
The other common reason is that the aspect ratio is off. If your picture is 800 pixels by 600 pixels. That’s a standard aspect ratio of 4:3. Now, if you change that aspect ratio to, well, anything else, your image will warp to fit the new shape.
Now, this doesn’t sound all that common, but it happens in small ways. For example, in one of my email newsletters, I placed my square image of 400×400 into a frame that was 400×405. That meant my picture had to be stretched to fill the space, causing a slight blurring. The same thing would have happened if it was 400×399.

How To Avoid Blurry Images
The best way to avoid it is to pay attention to the actual picture width and height in pixels. If you’re displaying the image, try to keep the display smaller than or equal to the file. And, similarly, make sure the aspect ratio remains the same.
Does DPI or PPI Resolution Matter?
No. Not at all. Certainly not, unless you’re making changes that actively mess things up. To be honest, this is a little tricky to explain, and I’ll try, but here is an excellent article on this.
See, DPI or PPI doesn’t matter because the dots per inch or pixels per inch are about printing, not digital image quality. When it comes to digital image quality, what matters most is megapixels, which is simply pixel width multiplied by pixel height. So if your image is 1080×1920, then the resolution is 2,073,600, which is 2.1Mp.
So, if our 1080×1920 image is set to 72 DPI, then that’s actually 15 inches by 27 inches (roughly). Printing that on as a 5″ by 8″ photograph will have the same printed quality as 300 DPI.
That’s a complicated way of saying ignore DPI unless you’re printing things out. Then, if you are printing a digital image, the same rules as above apply. Don’t stretch a small picture into a larger space and preserve the aspect ration. What you don’t want to do is change the DPI manually. It’s likely not even necessary.
How To Ensure Your Images Look Great
You should do a few things to start that will help make sure the camera output is as good as the real thing. It begins with the camera and the camera settings. Whether you’re using your mobile phone or a camera, make sure it’s set to capture images at a decent resolution (in Mp, or Megapixels).
Then, it’s all about the photographer. A shaky hand won’t capture images with focus and clarity. So, if you’re prone to drinking too much coffee like I am, consider using a tripod.
Editing software also makes a difference. Good editing software gives you more options regarding how you can save your images. Editing software usually has settings that allow you to save files at the best quality and smallest file size. Professional-grade software will have great presets too, provided you’re not scared off by the complexity.
The Double Rule
I personally have a rule. I generally format images to be twice the size I expect them to be rendered at. So if I expect to display my image online at 500×1000 pixels, I’ll make sure my file looks awesome at 1000x2000px. This is a low-key way of ensuring crisp images, provided, of course, that the file size is reasonable.
Tips To Lower The Image File Size Without Loss of Quality
The very first thing I do to lower the file size is to remove the metadata. Most images, especially when coming from a camera, have a ton of hidden data like the camera, timestamp, and other information. And it all increases the file size.
I use ImageOptim to instantly remove this extra data and can lower the file size by up to 25% sometimes. ImageOptim is only for Mac, but they have some other platform options here.

Resizing your image is a super-easy way to lower the file size. If your camera takes photos at 8 megapixels, your image will be 3264x2448px. That’s still an aspect ration of 4:3. So, if you save the image as 1600x1200px, you’ll retain the aspect ratio, but have a way smaller image. And a smaller size file.
Sharing Huge Files
And yet, sometimes, you really can’t worry about smaller file sizes when sharing photographs with clients. In which case, I figured it’s worth mentioning how to share large files without driving your clients crazy.
My personal favorites are Dropbox, OneDrive, or WeTransfer. All of these are great options when it comes to sharing Gigabytes worth of files.
When In Doubt, Keep It Simple
This might feel like a lot to take in, but whenever in doubt, just keep things simple. Stick to the standard file types, save your images at reasonable sizes, and all will work out just fine. And if you’re ever in doubt, ask someone. But there’s one major tip I’d like to leave you with.
Find your workflow when it comes to handling images. Find an image editing software you like, learn the basics, and build a rote workflow that feels good to you. It will make image editing, saving, and sharing, a breeze.